Pagina principale  |  Contatto  

Indirizzo e-mail

Password

Registrati ora!

Hai dimenticato la password?

Treehouse Treasures
 
Novità
  Partecipa ora
  Bacheche di messaggi 
  Galleria di immagini 
 File e documenti 
 Sondaggi e test 
  Lista dei Partecipanti
 ►► How to Join ◄◄ 
 ►Getting Started 
 Please Read 
 -:¦:--:¦:- Messages -:¦:--:¦:- 
 ♥ General 
 ♥ Daily Greetings & Checking In 
 ♥ Broken Links 
 ♥ Post Office 
 ♥ PSP Lessons 
 ♥ Chat 
  Post Codes 
  PSP Challenges 
  Smileys 
  Taggy Me 
 -:¦:-:¦:- Tag Galleries -:¦:-:¦:- 
 ♥ Artist Appreciation 
 ● Autumn 
 ▲Christmas 
 † Halloween 
 ■ Pirate 
 ╠ Steampunk 
 ♣ St. Patrick`s Day 
 :¦: Winter 
 -:¦:--:¦:-Tutorial Links-:¦:--:¦:- 
 ● Animation Shop Tuts 
 ● Autumn Tutorials 
 ● Blinkie Tutorials 
 ● Halloween Tutorials 
 ● Member Tutorials 
 ● Old School Tutorials 
 ● Text Tutorials 
 ● Christmas Tutorials 
 ►►► JUDY TUTS ◄◄◄ 
 ● Animated Filmstrip 
 ● Cutout Text 
 ● Diamond Jiggler Bling 
 ● Diver Smiley Tag 
 ● Flag Glitz Glitter 
 ● Gardenhose Tag 
 ● Glitz Glitter 
 ● Making Movies 
 ● Rainbow Motion Text 
 ● Tiny Box Smiley 
 ● Twinkle 
 ● Vector Text Node Edit 
 ● Watery Grave 
 ►►► KARLA TUTS ◄◄◄ 
 ♥ Coloring Pages: Color & Edit 
 ♥ Dazzle Doll Glitter Sig 
 ♥ Glitter Sig 
 ♥ Kamikaze Halftone 
 ♥ Mish Mash Text 
 ♥ Stellar Bling Text 
 ►►► REBEL TUTS ◄◄◄ 
 ● Chrome Bling`n Text 
 ● Gold & Diamonds 
 ►►►TIMBER TUTS◄◄◄ 
 ● Amazon Southwest 
 ● American Idol Noisy 
 ● Autumn Deco Spice 
 ● Billo Disco Love Trail 
 ● Blackout Scene Text 
 ● Carnivale Cane Text 
 ● Etched Glass Text 
 ● Gold Bling Text Revised 
 ● Groovy Text 
 ● Hearts Aglitter 
 ● Herringbone Frame 
 ● Hollywood Fireworks 
 ● Holy Ravioli Serape Text 
 ● Itty-Bitty Blinkie 
 ● Melted Candle Text 
 ● Patriot Text 
 ● Pique Glitter Drops Text 
 ● Planet X Space Text 
 ● Ribbon Candy Text 
 ● See-Through Text 
 ● Shiny Metal Stud 
 ● Snowman Bar 
 ● Sunrise `n` Set Text 
 ● Windy Halftone Text 
 ►► MEMBER TUTS ◄◄ 
 ● DrumagStudioNF Text 
 ● Glass Text 
 ● Surfer Tag Text 
 -:¦:--:¦:--:¦:--:¦:--:¦:--:¦:--:¦:--:¦:-:¦:- 
 ►►►►►►►►►►►►► 
 ● GBTRT Page 2 
 ● IBBBT Page 2 
 ● IBBBT Page 3 
 ● PTT Page 2 
 ● PXST Page 2 
 
 
  Strumenti
 
Coloring Pages: Editing & Coloring Mini Tutorial


This is something I was working on and it ended up becoming a "mini tutorial" :-D Hope I got things clearly explained, if not *oopsie* lol

-=-=-=-=-=-=-=-=-=-=-=-=-=-

Requires: PSP (version of choice) & Animation Shop.
Needed material: a coloring page of choice
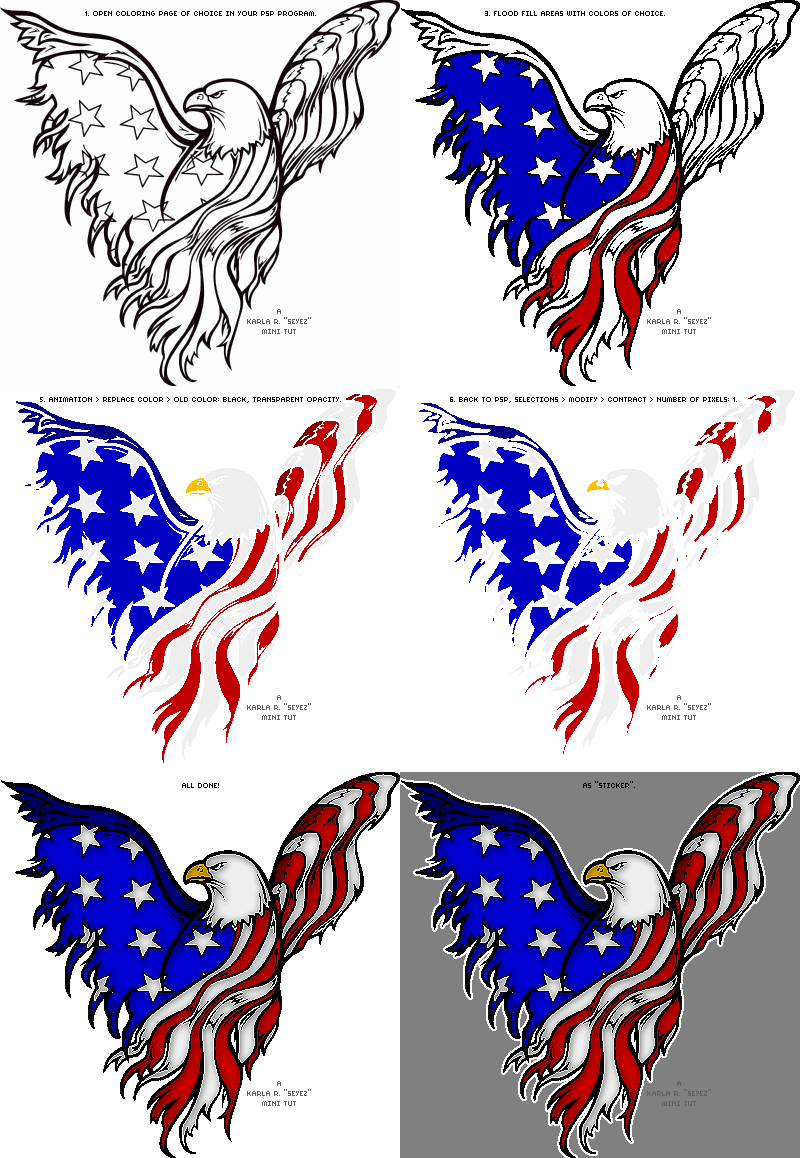


1. Open coloring page of choice in your PSP program.

2. To make lines easier for coloring in, you will: Adjust > Brightness & Contrast > Threshold @ 128.

Lines in image are now "cleaned up" which make it easier to color in. You can also remove the surrounding white background from your image by using the Magic Wand or Eraser tools (whichever works best for you).

3. Flood fill areas with colors of choice. If there are openings in areas that are not closed off, take a 1px square brush (or any setting size 7 brush tip you may need) and "close up" those areas.

4. Now that you have colored in your picture, copy and paste it to Animation Shop (do not close your work in progress in PSP).

5. To remove the black outline, go to Animation > Replace Color > Old Color: black (Tolerance and Match mode I leave it to default: 20, RBG Value), With: Transparent opacity.

6. Copy and paste as new layer on your work in progress back in PSP (center it accordingly to your coloring page image) and make it an active selection: Selctions > Select All (ctrl+A) > Float (ctrl+F).

Contract this new layer: Selections > Modify > Contract > Number of pixels: 1.

7. To add shading go to: Effects > 3D Effects > Cutout: 1, 1, 50, 10.00, black (do not click check in "Fill interior with color").

8. If happy with the way it looks, you have just finished "coloring" your page image! *yay*

9. If not happy, you can always play around with the cutout settings and opacity of this layer to adjust the look of the shading (shown at 50% opacity). *wink*

There are many things you can do with this, such as add a 1-2px border around your image and create a "sticker" look. Also, make your colors glitter!

Feel free to snag and edit to your liking :-)

See member results HERE


This tutorial was created by me and should not be reposted or shared anywhere without my consent. Tutorial was created and written by Karla aka SilentEyez on July 2nd, 2018.
 
©2025 - Gabitos - Tutti i diritti riservati