Please feel free to link to this tutorial, and/or print it out for your own personal use, but do not copy it in any way to put online, pass out, or re-write without my permission. Any resemblance to any other tutorial like this is purely coincidental.
This tutorial was written January 30, 2004
Thanks, ©Kes (Rachel)
What you will need for this tutorial:
Paint Shop Pro (any version should work. Tut written with PSP8)
Eye Candy 3 or Eye Candy 4000
Instructions:
Open a new Raster Layer (any size of your choice.
I typically use 600 x 300 pixels and then crop the extra when I`m done).
Type your text (use any color, font and size you want) and select your text (marching ants).
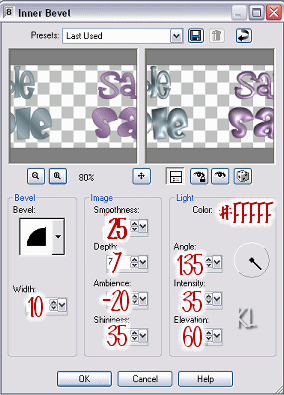
Apply the following Inner Bevel setting:

Do not deselect your text.
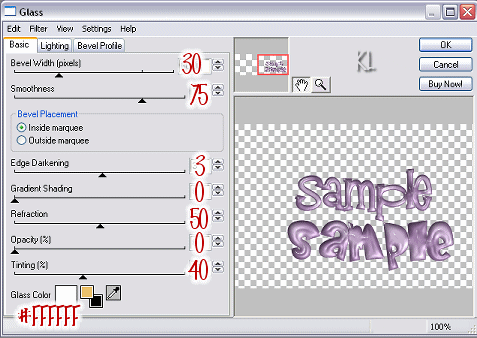
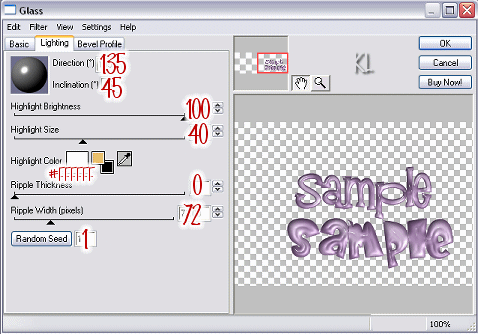
With your text still selected apply the EyeCandy filter.
Go to Effects > Plugins > EyeCandy
For Eye Candy 3:

For Eye Candy 4000:


Do not deselect your text.
With your text still selected apply a Drop Shadow with the following settings:
Vertical: 2 Horizontal: 2
Opacity: 64 Blur: 2.97 Color: Black (#000000)
You may now deselect your text.
Your glass effect is now finished!

(Font used for "Kes" is LD Stardust, a font from www.letteringdelights.com.
I'd love to see your results!
You can post them with the other member results
HERE |
|

