
Continued from Page 1 |
 |
25. Add a New Raster Layer  and name it White. and name it White.

Expand the selection  by 3 pixels. by 3 pixels.
Selections > Modify > Expand |
 |
26. Set the Foreground Color to #FFFFFF (white).
Flood Fill  the selection with the foreground color. the selection with the foreground color. |
 |
27. Contract  the selection by 1 pixel. the selection by 1 pixel.
Selections > Modify > Contract |
 |
28. Invert  the selection. the selection.
Selections > Invert (Ctrl+Shift+I)
Apply a Gaussian Blur (Radius=1).
Adjust > Blur > Gaussian Blur |
 |
29. Deselect  . .
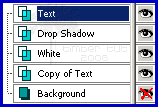
Make Text active.
Hide the Background.
 |
| Animate the Text |
 |
30. Add Noise  with these settings. with these settings.
Adjust > Add/Remove Noise > Add Noise
 |
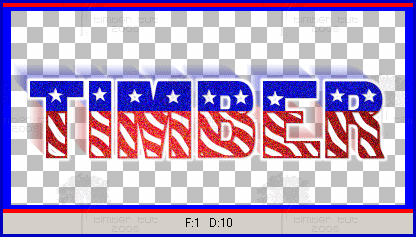
31. Copy the Merged  image. image.
Edit > Copy Merged (Ctrl+Shift+C)
In AS, Paste as a New Animation  . .
Edit > Paste > As New Animation (Ctrl+V)
 |
32. Back in PSP, Undo  the noise. the noise.
Edit > Undo Add Noise (Ctrl+Z)
Now add the same Noise  setting again. setting again.
Tip: A quick way to add the same Noise setting again
is to hold down the Shift key and click the Noise button
(either on a toolbar or on the drop-down menu).
Copy the Merged  image, and in AS, Paste After the Current Frame image, and in AS, Paste After the Current Frame  . .
Edit > Paste > After Current Frame (Shift+Ctrl+L)

(Screenshot not actual size) |
33. Repeat step #32.

(Screenshot not actual size) |
| Crop and Save the Animation |
34. Crop the animation by double-clicking on the Crop icon on the Tool Palette.

Choose "Surround the opaque area" and click OK.


(Screenshot not actual size) |
35. Double-click within the crop square to crop (or press the Crop button).

(Screenshot not actual size) |
36. Save the animation  . .
File > Save (Ctrl+S)
Click on the Customize button.
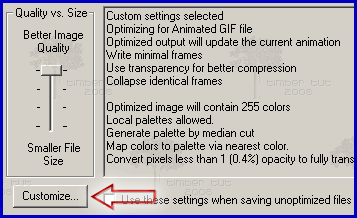
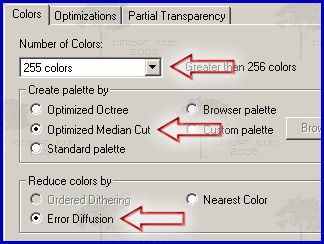
Click on the Colors tab and choose these settings.
Click on the Optimizations tab and choose these settings.

Click on the Partial Transparency tab and choose these settings.
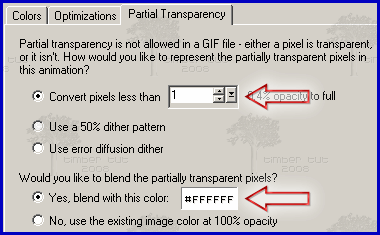
Click OK.
Click Next.
Click Next.
Click Next.
Click Finish.
YOU'RE DONE!!!
 |
| Variations |
 |
For this example, I used Eye Candy 3 for the Motion Trail (settings here). All other steps of the tutorial are the same. |
 |
For this example, I added Noise  (change 50 to 75) to Copy of Text rather than Text. All other steps of the tutorial are the same. (change 50 to 75) to Copy of Text rather than Text. All other steps of the tutorial are the same. |
 |
For this example, I used two glitter tiles (blue and red) for the Flood Fill  steps #10 and #14. I used Eye Candy 3 for the Motion Trail (same settings as just above). If you know how to work with glitters, then you may be able to figure out how to make this one. Instead of having one Text layer and one Copy of Text, you'd have three. Do not add Noise in step #30. steps #10 and #14. I used Eye Candy 3 for the Motion Trail (same settings as just above). If you know how to work with glitters, then you may be able to figure out how to make this one. Instead of having one Text layer and one Copy of Text, you'd have three. Do not add Noise in step #30. |
 |
For this example, I added a fireworks tube by Rainbow Coffi here (top row center). I "colorized" the dark blue trails with the Change To Target Brush Tool  (Default settings), Foreground Color #0000C0. Then I resized the tube (Shift+S) by 50% (Smart Size, Lock Aspect Ratio checked). Then I added a "drop shadow". I Copied (Default settings), Foreground Color #0000C0. Then I resized the tube (Shift+S) by 50% (Smart Size, Lock Aspect Ratio checked). Then I added a "drop shadow". I Copied  the tube and Pasted As a New Layer the tube and Pasted As a New Layer  above Text (after step #29). Then I Moved above Text (after step #29). Then I Moved  the tube a little, so that one of the stars of the tube was aligned on top of a star in the text (first star on letter B). I made Text active (step #30) to add the Noise the tube a little, so that one of the stars of the tube was aligned on top of a star in the text (first star on letter B). I made Text active (step #30) to add the Noise  , then made the tube layer active to also add Noise , then made the tube layer active to also add Noise  (change 50 to 25). At step #32, I had to Undo (change 50 to 25). At step #32, I had to Undo  three (3) times instead of one to get back to Text. All other steps of the tutorial are the same. three (3) times instead of one to get back to Text. All other steps of the tutorial are the same. |
 |
Thank you to Vicky B. for coming up with the idea to add this tube to the text! For this example, I added a different fireworks tube here (creator unknown). I resized the tube (Shift+S) by 65% (Smart Size, Lock Aspect Ratio checked). Then I added a "drop shadow". I Copied  the tube and Pasted As a New Layer the tube and Pasted As a New Layer  above Text (after step #29). Then I Moved above Text (after step #29). Then I Moved  the tube a little, so that one of the stars of the tube was aligned on top of a star in the text (first star on letter M). I made Text active (step #30) to add the Noise the tube a little, so that one of the stars of the tube was aligned on top of a star in the text (first star on letter M). I made Text active (step #30) to add the Noise  , then made the tube layer active to also add Noise , then made the tube layer active to also add Noise  (change 50 to 20). At step #32, I had to Undo (change 50 to 20). At step #32, I had to Undo  three (3) times instead of one to get back to Text. All other steps of the tutorial are the same. three (3) times instead of one to get back to Text. All other steps of the tutorial are the same. |
 |
For this example, I used CircuitBoredNF font. For the Flood Fill  steps, I set the Foreground Color=#40FF40 and Background Color=#000000. Both Foreground and Background are set to Gradient (Angle=90, Repeats=1). Check steps, I set the Foreground Color=#40FF40 and Background Color=#000000. Both Foreground and Background are set to Gradient (Angle=90, Repeats=1). Check  Invert on the Background Gradient. Invert on the Background Gradient.

I Flood Filled  the top half of the selection (step #10) with the Foreground Gradient, then Flood Filled the bottom half (step #14) with the Background Gradient. I reduced the Length of the Motion Trail to 20 (step #24). I Expanded the top half of the selection (step #10) with the Foreground Gradient, then Flood Filled the bottom half (step #14) with the Background Gradient. I reduced the Length of the Motion Trail to 20 (step #24). I Expanded  the selection by 2 rather than 3 (step #25). I omitted step #27. I changed the Noise the selection by 2 rather than 3 (step #25). I omitted step #27. I changed the Noise  setting from 50 to 25 (step #30). All other steps of the tutorial are the same. setting from 50 to 25 (step #30). All other steps of the tutorial are the same. |
I can't wait to see what variations you come up with!
See member results HERE |

