You may print this out for your own personal use, but please do not rewrite, translate, e-mail out, offer any part of this on any other site, add to a CD, or claim this as your own. Your finished result is yours to do with as you please, including making tags and/or snags for others. You may offer your results wherever you wish, but you may not sell for profit. This tutorial was written by timber on January 31, 2008.
I wrote this tutorial using PSP8 and Animation Shop 3.10. Although I have included as many screenshots and details to make this tutorial easier for beginners, some basic knowledge of PSP and Animation Shop would be helpful. Unless I say otherwise, all 'clicks' are with the left mouse button. I have included keyboard shortcuts for the steps in parentheses ( ).
For this tutorial, you will need:
Paint Shop Pro
Animation Shop
SuperBladePro
Meadows Studio Coconut Ice SBP Preset
VisMan VM Toolbox/Zoom Blur Filter
DSB Flux/Bright Noise Filter
Auburn Angel's Graphics Teal #1 Metallic Glitter Tile
Planet X Font |
1. Extract the three Coconut Ice files (M_white_texture, M_white_pic, M_coconutice.q5q) to the Environments and Textures folder of your SuperBladePro folder.
Extract the zoom.8bf and BrightNoise.8bf files to your PlugIns folder.
Open PSP and Animation Shop (AS).
Open the font and minimize it to the taskbar. |
2. In AS, open the teal01_tlg.gif file.
Select all  the frames and copy the frames and copy  . .
Edit > Select All (Ctrl+A)
Edit > Copy (Ctrl+C)
In PSP, paste the frames as multiple images  . .
Edit > Paste > AS Animation as Multiple Images |
3. Create a new image  500x150 with a white background. 500x150 with a white background.
File > New (Ctrl+N)
screenshot |
| Create the Text |
4. Load the Text Tool  (T) and apply these settings* (all other settings on the toolbar should be default settings). (T) and apply these settings* (all other settings on the toolbar should be default settings).

*If you're using PSP 10/11/12, your text size is rendered differently than mine, so instead of using size 48, try size 64. And you may need to change your Kerning to -175 (instead of -250). |
 |
5. On the Materials palette, set the Foreground Color to #000000 and the Background Color to #0092D4. |
 |
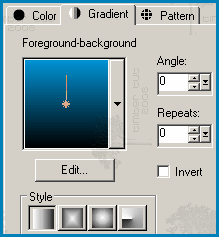
6. On the Materials palette, set the Foreground Style to Gradient  . Load the Foreground-background gradient and apply these settings. . Load the Foreground-background gradient and apply these settings.
 |
 |
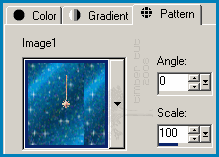
7. On the Materials palette, set the Background Style to Pattern  . Load the first of the three glitter images (these images should be towards the top of your pattern list; they may or may not be labeled Image1, Image2, and Image3 as mine are). Apply these settings to the pattern and click OK. . Load the first of the three glitter images (these images should be towards the top of your pattern list; they may or may not be labeled Image1, Image2, and Image3 as mine are). Apply these settings to the pattern and click OK.
 |
8. Click on the canvas, type your text into the Text Entry dialog, and click Apply.
Center the text on the canvas  . .
Objects > Align > Center on Canvas
 |
9. Right-click on the canvas and choose Edit Text  (the Text Entry dialog opens). (the Text Entry dialog opens).
On the Materials palette, click on the Background Material box, then choose the second of the three glitter images from the pattern list and click OK (do not click Apply yet).
Click on the Background Material box again, and choose the third of the three glitter images this time and click OK.
Now click Apply (to close the Text Entry dialog).
 |
10. Now choose which of the three glitter patterns you like best in your text. To do this, Undo  (Ctrl+Z) to see your text with the second glitter pattern. Then Undo (Ctrl+Z) to see your text with the second glitter pattern. Then Undo  again to see your text with the first glitter pattern. again to see your text with the first glitter pattern.
To see the text choices again, Redo  (Ctrl+Alt+Z) to see pattern #2, then Redo (Ctrl+Alt+Z) to see pattern #2, then Redo  again to see pattern #3. again to see pattern #3.
Once you have decided which pattern you like best, continue with the next step. I like the way my text looks using the first pattern, so that is what I'll be using for my example.
 |
11. Rename the Vector 1 layer "Text".

Select Text  and convert it to a raster layer and convert it to a raster layer  . .
Selections > From Vector Object (Ctrl+Shift+B)
Layers > Convert to Raster Layer

 |
12. Contract the selection  by 2 pixels. by 2 pixels.
Selections > Modify > Contract
 |
13. Apply the SuperBladePro Coconut Ice preset.
Effects > Plugins > Flaming Pear > SuperBladePro
Click the Open Settings button  and choose M_coconutice.q5q from the list of presets. Click Open. Click OK. and choose M_coconutice.q5q from the list of presets. Click Open. Click OK.
 |
14. Sharpen  . .
Adjust > Sharpness > Sharpen

Deselect  . .
Selections > Select None (Ctrl+D) |
15. Duplicate  Text twice. Text twice.
Layers > Duplicate
Layers > Duplicate

 |
16. Add Noise  to Copy (2) of Text with these settings. to Copy (2) of Text with these settings.

To avoid the pixel clumping that sometimes occurs with Random noise, you can close the Add Noise window and reopen (this will give you a different 15% setting). Or you can change the percentage by a pixel or two (you can choose 16-17% if you want more noise, or you can choose 14-13% for less noise).
 |
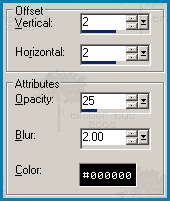
17. Apply these Drop Shadow  settings (color=#000000). settings (color=#000000).
Effects > 3D Effects > Drop Shadow

 |
18. Hide  Copy (2) of Text. Copy (2) of Text.
Make Copy of Text active.

Add the same Noise  and Drop Shadow and Drop Shadow  settings from steps #16-17. settings from steps #16-17.
 |
19. Hide  Copy of Text. Copy of Text.
Make Text active.

Add the same Noise  and Drop Shadow and Drop Shadow  settings from steps #16-17. settings from steps #16-17.
 |
Continue to Page 2
|

