
Continued from Page 1
|
| Create the Zoom Blur Background |
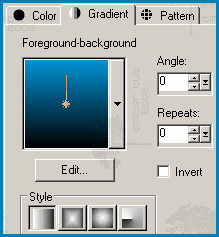 |
20. On the Materials palette, change the Foreground color to #606060.
Click on the Foreground Material box and change the Repeats of the gradient to 1. Click OK.

The Background Pattern can be any of the three glitter images. |
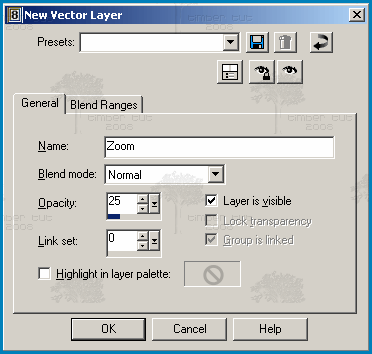 |
21. Add a New Vector Layer  , name it Zoom, and set the opacity to 25. , name it Zoom, and set the opacity to 25.
Layers > New Vector Layer
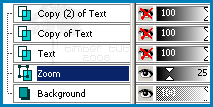
Move Zoom down  . .
Layers > Arrange > Move Down
Hide  Text (for now). Text (for now).
 |
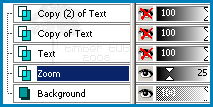
22. Click on the canvas, type the same text (from step #8) into the Text Entry dialog, and click Apply.
Center the text on the canvas  . .
Objects > Align > Center on Canvas

Convert Zoom to a raster layer.
Layers >Convert to Raster Layer
 |
23. Apply these VM Toolbox / Zoom Blur settings.
Effects > Plugins > VM Toolbox > Zoom Blur
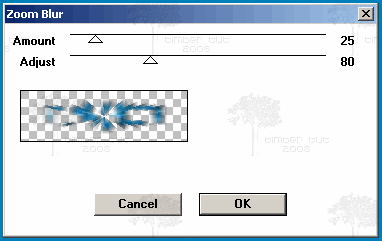
You can get a different Zoom Blur effect using the same Text and Zoom Blur settings just by changing your canvas size prior to applying the Zoom Blur. I chose this canvas size (500x150), because I liked the effect at this size.
 |
24. Duplicate Zoom twice.
Layers > Duplicate
Layers > Duplicate

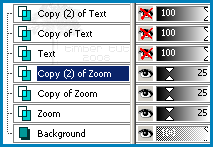 |
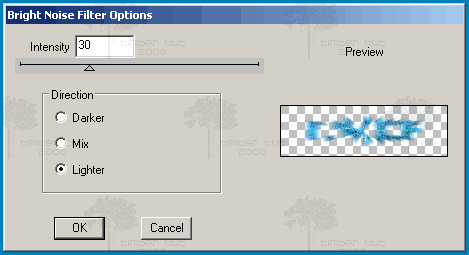
25. Apply these DSB Flux / Bright Noise settings.
Effects > Plugins > DSB Flux > Bright Noise
 |
26. Hide  Copy (2) of Zoom. Copy (2) of Zoom.
Make Copy of Zoom active.
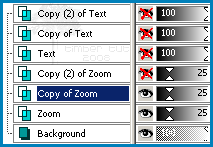
Apply the same Bright Noise settings from above.
 |
27. Hide  Copy of Zoom. Copy of Zoom.
Make Zoom active.
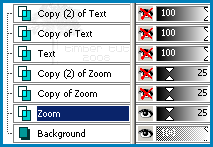
Apply the same Bright Noise settings from above.
 |
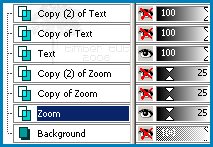
28. Unhide  Text. Text.
Hide  Background. Background.
 |
| Animate The Text |
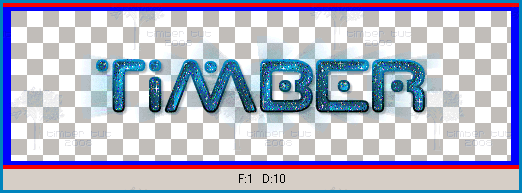
29. Copy the merged  image. image.
Edit > Copy Merged (Ctrl+Shift+C)
In AS, paste as a new animation  . .
Edit > Paste > As New Animation (Ctrl+V)
 |
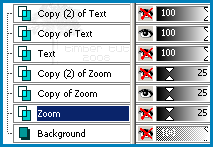
30. Back in PSP, hide  Zoom and unhide Zoom and unhide  Copy of Zoom. Copy of Zoom.
Hide  Text and unhide Text and unhide  Copy of Text. Copy of Text.
 |
31. Copy the merged  image. image.
Edit > Copy Merged (Ctrl+Shift+C)
In AS, paste after the current frame  . .
Edit > Paste > After Current Frame (Shift+Ctrl+L)

(Screenshot not actual size) |
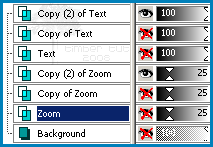
32. Back in PSP, hide  Copy of Zoom and unhide Copy of Zoom and unhide  Copy (2) of Zoom. Copy (2) of Zoom.
Hide  Copy of Text and unhide Copy of Text and unhide  Copy (2) of Text. Copy (2) of Text.
 |
33. Copy the merged  image. image.
In AS, paste after the current frame  . .

(Screenshot not actual size) |
34. View the animation  . .
View > Animation
If the animation looks good to you, you're ready to crop and save.
Close the View Animation window. |
| Crop and Save the Animation |
35. Crop the animation by double-clicking on the Crop icon on the Tool Palette.

Choose "Surround the opaque area" and click OK.


(Screenshot not actual size) |
36. Double-click within the crop square to crop (or press the Crop button).

(Screenshot showing only Frame 1 of 3 frames) |
37. Save the animation  . .
File > Save (Ctrl+S)
Click on the Customize button.
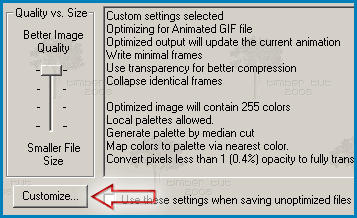
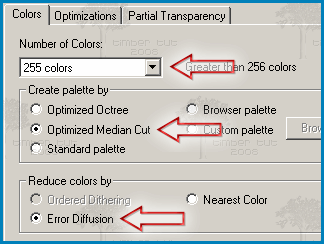
Click on the Colors tab and choose these settings.
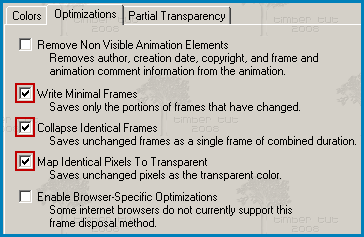
Click on the Optimizations tab and choose these settings.
Click on the Partial Transparency tab and choose these settings.
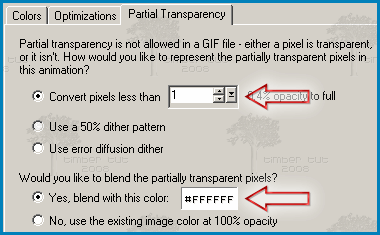
Click OK.
Click Next.
Click Next.
Click Next.
Click Finish.
YOU'RE DONE!!!
 |
Color Variations
For a different look, try these various pattern-changing techniques. |
For this example, I started with the same glitter image, but I "colorized" it first before using it for my Background Pattern.

To "colorize" the glitter image, I added a New Raster Layer, then flooded the new layer with the Foreground-Background Gradient with these settings (Linear, Angle=135, Repeats=2, Invert UNchecked; Foreground Color=#109A10, Background Color=#C0FFC0).

I changed the Blend Mode of the flooded gradient layer to Soft Light and then merged the visible layers.
I set the Background Pattern to this merged glitter image. I set the Foreground Color to #005035 (I used my color picker to choose a color from the darkest section of the merged image). I set the Background Color to #00B7D6 (I used my color picker to choose a color from the lightest section of the merged image). The Foreground Gradient has the same settings as step #6 of the tutorial.

All the other tutorial steps are the same except: step #20, I changed the Foreground Color to #80A79A (this color is 50% opacity of the Foreground Color in the screenshot just above). |
For this example, I used Auburn Angel's Purple #2 Metallic Glitter Tile, but I changed it a bit before I used it for my Background Pattern.

First I chose one of the three glitter images and duplicated the Frame 1 layer. Then I changed the Blend Mode of the duplicate layer to Multiply, and then merged the visible layers.
I set the Background Pattern to this merged glitter image. I set the Foreground Color to #340B59 and the Background Color to #D77BFD (both colors were picked from the merged image). The Foreground Gradient has the same settings as step #6 of the tutorial.

All the other tutorial steps are the same except for these: step #20, I did not change the Foreground Color; step #21, I set the Opacity of the Zoom layer to 30% (instead of 25). |
For this example, I combined two (2) Auburn Angel's Metallic Glitter Tiles.

First I created the merged image to use for the Background Pattern. I started with the same teal01_tlg image that I used for the tutorial example (for me, that was image 1). First I chose one of the three glitter images and duplicated the Frame 1 layer. Then I changed the Blend Mode of the duplicate layer to Multiply, and then merged the visible layers.
I set the Background Pattern to this merged glitter image. I set the Foreground Color to #340B59 and the Background Color to #D77BFD (both colors were picked from the merged image). The Foreground Gradient has the same settings as step #6 of the tutorial.

All the other tutorial steps are the same except for these: step #20, I did not change the Foreground Color; step #21, I set the Opacity of the Zoom layer to 30% (instead of 25). |
For this example, I used an orange glitter tile that I made myself, since Auburn Angel didn't have an orange metallic glitter tile for me to play with.

To make my orange-spice glitter, I created a New Image 78x110 (same as Auburn Angel) on a transparent background. On the Materials palette, I set the Foreground to Gradient and loaded a multi-colored orange gradient that I had, using the angle and repeats that I liked. Then I flooded the Raster 1 layer with the gradient. I duplicated the layer twice for a total of three layers (like the other glitter tiles). To each of the three layers I added random Noise (a variation of 13 to 15%). Then to each of the three layers I added VM Natural Sparkle (I used the default settings for one layer and just moved the Random Seed slider for the other two layers).
I set the Background Pattern to the first orange-spice glitter image and followed the tutorial method for choosing which image I liked best. I set the Foreground Color to #8F320B and the Background Color to #FF8910 (both colors were picked from the glitter image). The Foreground Gradient has the same settings as step #6 of the tutorial.

All the other tutorial steps are the same except for these: step #20, I did not change the Foreground Color; step #21, I set the Opacity of the Zoom layer to 32% (instead of 25). |
I'd love to see your results!
You can post them with the other member results
HERE
|

