
You may print this out for your own personal use, but please do not rewrite, translate, e-mail out, offer any part of this on any other site, add to a CD, or claim this as your own. Your finished result is yours to do with as you please, including making tags and/or snags for others. You may offer your results wherever you wish, but you may not sell for profit. This tutorial was written by timber on September 23, 2011.
I wrote this tutorial using PSP8. To complete this tutorial you should have a comfortable working knowledge of the Tools, Materials and Layer palettes, as well as the Menu options.
For this tutorial, you will need:
Paint Shop Pro
- Open PSP.
- Open an existing image or create a New Image to work on.
- Add a New Raster Layer.
- Load the Paint Brush Tool.
Select the +Round 10 brush from the Brush Tip drop-down list or apply these settings to the Paint Brush Tool (Shape:round; Size:10; Hardness:50; Step:10; Density:100; Thickness:100; Rotation:0; Opacity:100; Blend Mode:Normal; Continuous:Unchecked; Wet Look Paint:Unchecked).

- Make a single brush impression on the canvas with color #C0C0C0.
- Select the brush impression
Select All/Float/Defloat.
- Apply an Inner Bevel
Effects>3D Effects>Inner Bevel
Use the Default settings, or enter these settings if you don't have the default settings (Bevel:1, Width:8; Smoothness:0; Depth:20; Ambience:0; Shininess:0; Color:White; Angle:315; Intensity:50; Elevation:30).

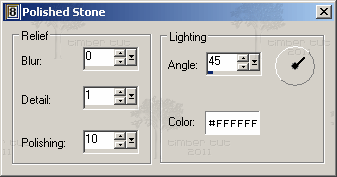
- Apply the Polished Stone filter.
Effects>Texture Effects>Polished Stone
(Blur:0; Detail:1; Polishing:10; Angle:45; Color:White).
- Select none.
Selections>Select None
Here's an example of the studs that I made in a spiral shape using brush sizes 8-15.

For this example, I used brush size 15 then applied Mura's Copies (spiral, number=30).

I've decorated my sig tag with the studs using size 11.
The font is Planet X, size 48.

For this tag, I loaded the +Square10 brush (instead of the round brush) and made my impression. Then I rotated the impression to the right 45 degrees before applying the bevel and polished stone filters. The font is Kingthings Chimera.

I'd love to see your results!
You can post them with the other member results
HERE |
|
 Post Codes
 PSP Challenges
 Smileys